Transcoder profiles allow you to export or display user media in custom sizes, formats and quality.
Three sections of Media Factory play a part in creating and implementing new transcoder profiles:
- Creating a new transcoder: Settings>Media Transcoder
- Seeing the new transcoder profile: Media>Media> Select a Media item>Embed Options
- Applying the new transcoder profile: Applications>Applications>Select an Application>Application templates
You can create three types of Transcoders:
- Audio Transcoder
- Image Transcoder
- Video Transcoder
To create a new transcoder:
- In the Navigation bar, select Settings>Media Transcoder.
Note: Ask the project manager to give you permission to this if you cannot see it.
- On the Media Transcoder page, c lick the New button.
- Fill out the following information:
- Title: The name of this transcoder rule
- Export Format: Select the type of format you want to transcode certain media files into:
- Audio: MP3
- Images: JPEG or PNG
- Video: 3GPP (GSM phones), 3GPP2 (CDMA phones), Flash Video, MPEG-2, MPEG-4 SP/ASP, MPEG-4 AVC/H.264 or Ogg Theora
- Apply to Filetypes: Depending on the selected Export format, you can select the filetypes this transcoder rule applies to.
- Auto-convert: There may be cases where only a few files will need this profile applied. Selecting this box ensures that for every uploaded file (from now on), this file will be created.
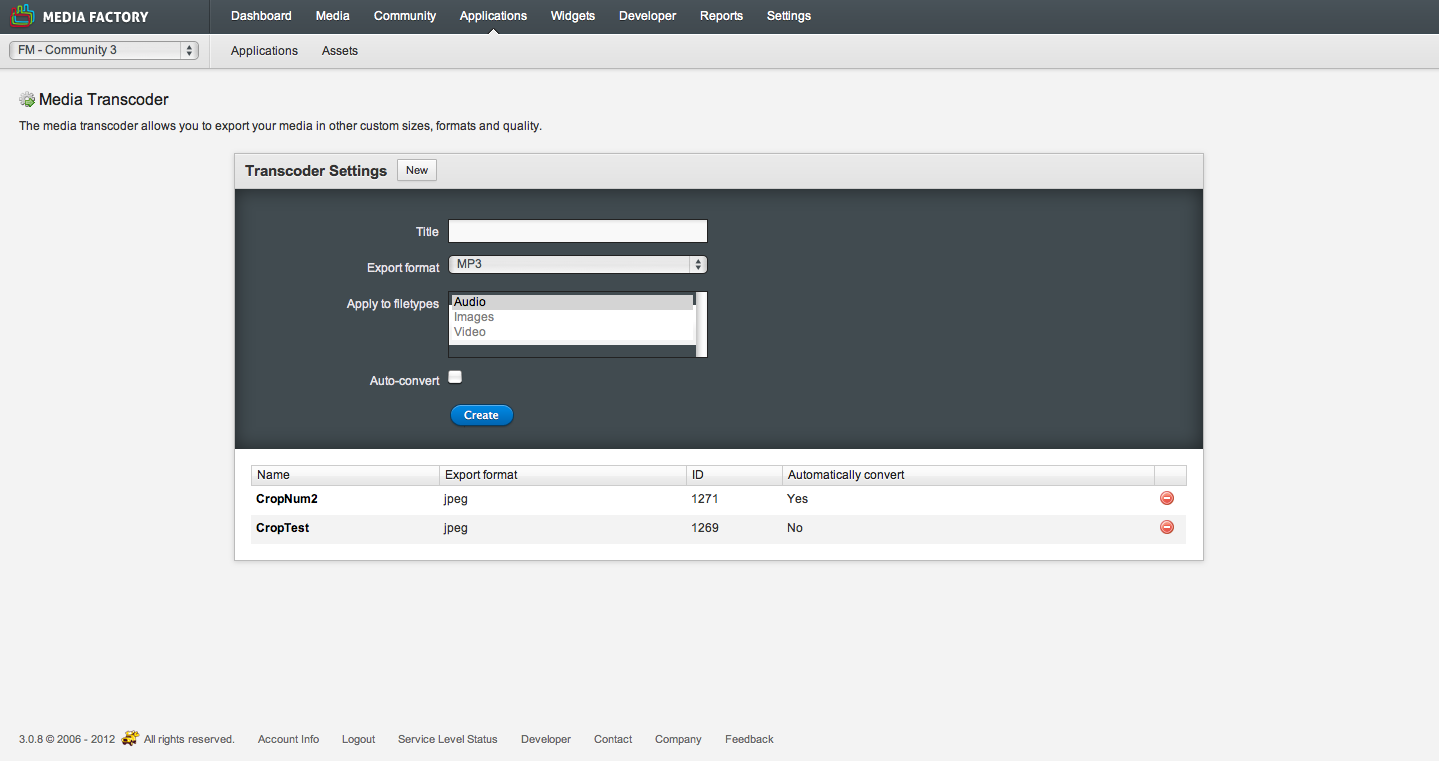
- Click Create.
Note: Editing the filetype is not possible after a transcoder is created. You will need to delete it and create new transcoder for the appropriate filetype.
Deleting Transcoders
You can delete transcoders if you no longer need them,
To delete a transcoder:
- In the Navigation bar, select Settings>Media Transcoder .
- On the Media Transcoder page, f ind the Transcoder that you no longer want.
- To delete a transcoder, click
 .
.
Options for an Audio Transcoder Profile
You can only convert audio to MP3 format. Here are the fields associated with Audio:
- Profile ID: You cannot edit this f ield. It is the id number used to apply the transcoder settings to media items.
- Title: Title of the setting.
- Export Format: MP3
- Automatically generate: If selected, files will be converted automatically.
- Audio bitrate: The bitrate for the audio stream in kb/s. 128 is a good quality/file size ratio.
- Audio sampling rate: The audio sampling rate in kHz. Generally 44100 is a good choice.
- Audio channels: The options are either auto, mono or stereo.
- Select External Storage location: You can select more than one option. There is a default location and there are external settings that have been previously set up.
Note: Click Save to save all changes.
Options for Image Transcoder Profiles
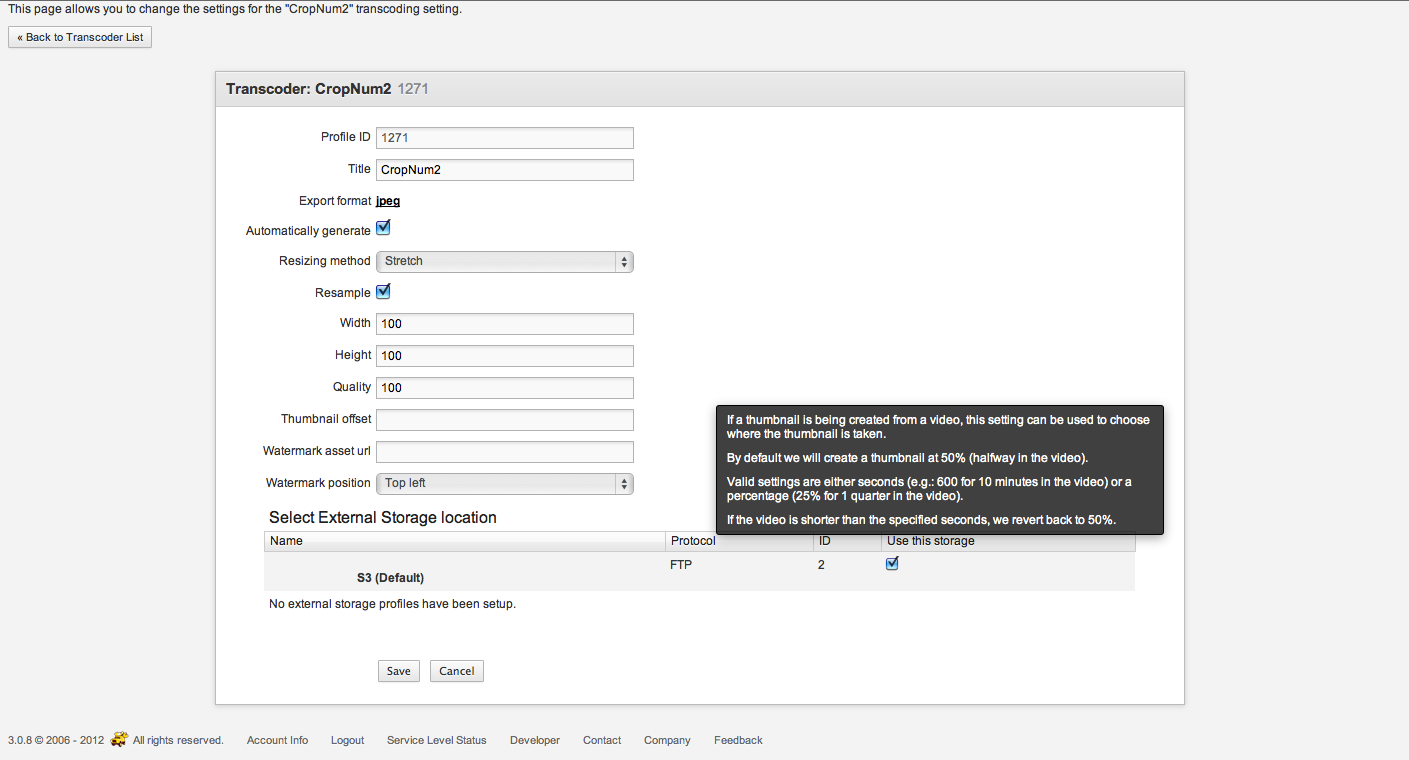
The options for Image transcoding are the following:
- Profile ID: You cannot edit this field. It is the id number used to apply the transcoder settings to media items.
- Title: Title of the setting.
- Export format: The chosen format. This cannot be edited.
- Automatically generate: If selected, files will be converted automatically.
- Resizing method: Defines how you want the input and output dimensions to be handled.
- Crop: Keeps the aspect ratio and the selected width and height; but it will cut off around the file to make it fit.
- Stretch: The file is blown up or shrunken, without taking the aspect ratio into consideration. This is the only option for 3gp and 3g2 files.
- Preserve aspect ratio: Attempts to resize the file to the specified dimensions, without changing the original aspect ratio.
- Retain original size: original size will remain constant.
- Width and Height: The output width and height in pixels.
Note: Not all codecs support odd numbers, so using an even number is often a better choice.
- Quality: The image quality. Choose a number between 0 and 100. The default is 75.
- Thumbnail: Not applicable for images.
- Watermark asset URL: Specify the URL to the image to be used as a watermark. The image must be a PNG and the URL must be correct.
- Watermark position: Select where to position the watermark.
- Select External Storage location: You can select more than one option. There is a default location and there are external settings that have been previously set up.
Note: Click Save to save all changes.
Options for Video Transcoder Profiles
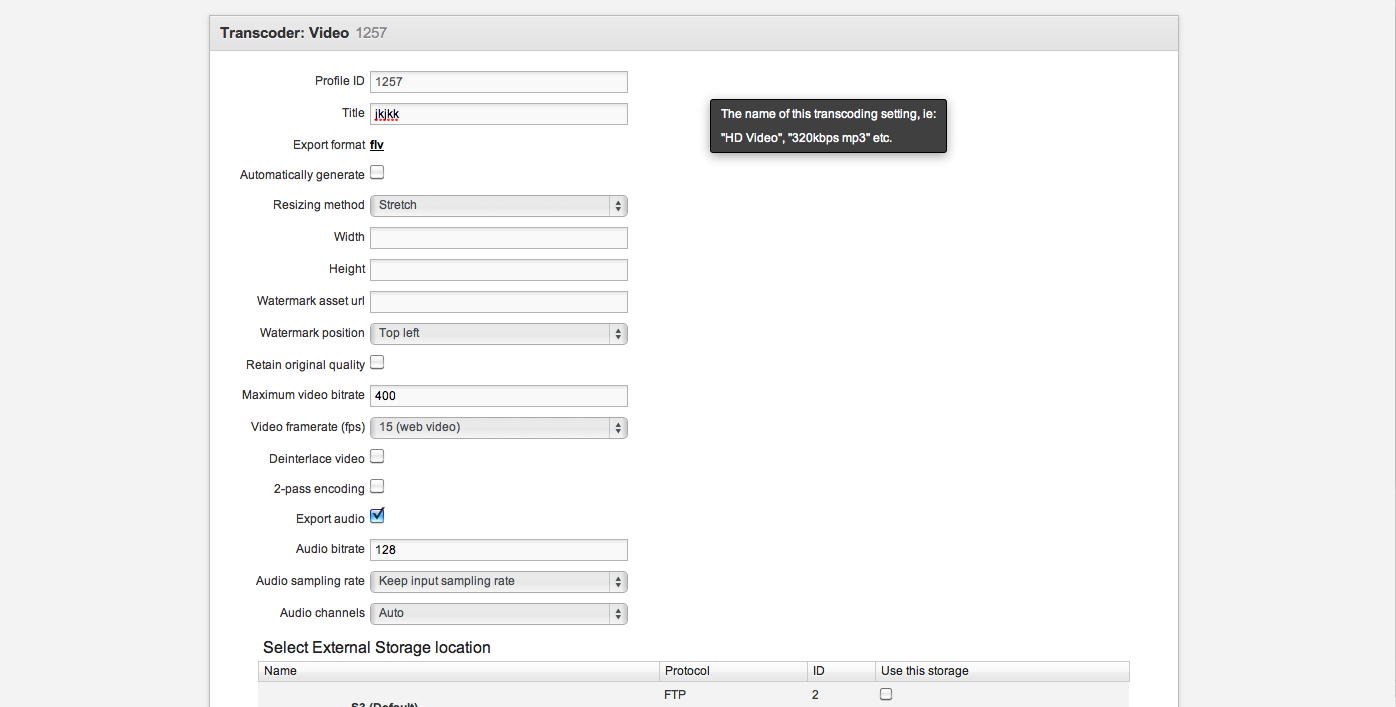
The options for Video transcoding are the following:
- Profile ID: You cannot edit this field. It is the id number used to apply the transcoder settings to media items.
- Title: Title of the setting.
- Export format: The chosen format. This cannot be edited.
- Automatically generate: If selected, files will be converted automatically.
- Resizing method: Defines how you want the input and output dimensions to be handled.
- Width and Height: The output width and height in pixels.
Note: Not all codecs support odd numbers, so using an even number is often a better choice.
- Watermark asset URL: Specify the URL to the image to be used as a watermark. The image must be a PNG and the URL must be correct.
- Watermark position: Select where to position the watermark.
- Retain original quality: If selected, determines the optimal bitrate to retain the same quality as the original. This can result in very large files. This is usually reserved for sending created files to a broadcast system.
- Maximum video bitrate: This is the file size to quality ratio. 300 is low quality, small file. 1000 is typically a high-quality, larger file. 700 is a good balance.
- Video framerate (fps): 15fps is typical for web video, 29.97 is the NTSC broadcast standard. For high-quality videos use 30fps.
- Deinterlace video: Many videos are interlaced, and look bad on the web. Unless you know you are uploading progressive videos, check this box.
- 2-pass encoding: Generates a higher-quality video, but takes longer to create. This is not compatible with H.264, so you should leave it unchecked; however, two-pass encoding is recommended for FLV.
- Export audio: If not selected, there is no sound.
- Audio bitrate: Save on bitrate by selecting lower rates for simpler audio, such as dialogue. 128 is the default.
- Audio sampling rate: Only change this if you are creating 8khz 3GP (mobile) video profiles.
- Audio channels: Only change this if you are creating mono 3GP (mobile) video profiles.
- Select External Storage location: You can select more than one option. There is a default location and there are external settings that have been previously set up.
Note: Click Save to save all progress or changes.
Viewing Embed Settings
If an image or video has been converted based on a transcoder setting, you can view the transcoded image or video on the Embed Options page.
To view embed settings for a media item:
- In the Navigation bar, select Media>Media.
- On the Media Overview page, double-click an image or video.
- On the Media Details page, under Tools, click the Embed Options button.
- On the Embed Options page, to view the file for different transcoder settings, under Transcoder Profiles, click an item under the Name column.
Note: If the image or video file has not been created for a transcoder code, a message appears indicating that the file has not yet been created. You have the option of creating it.
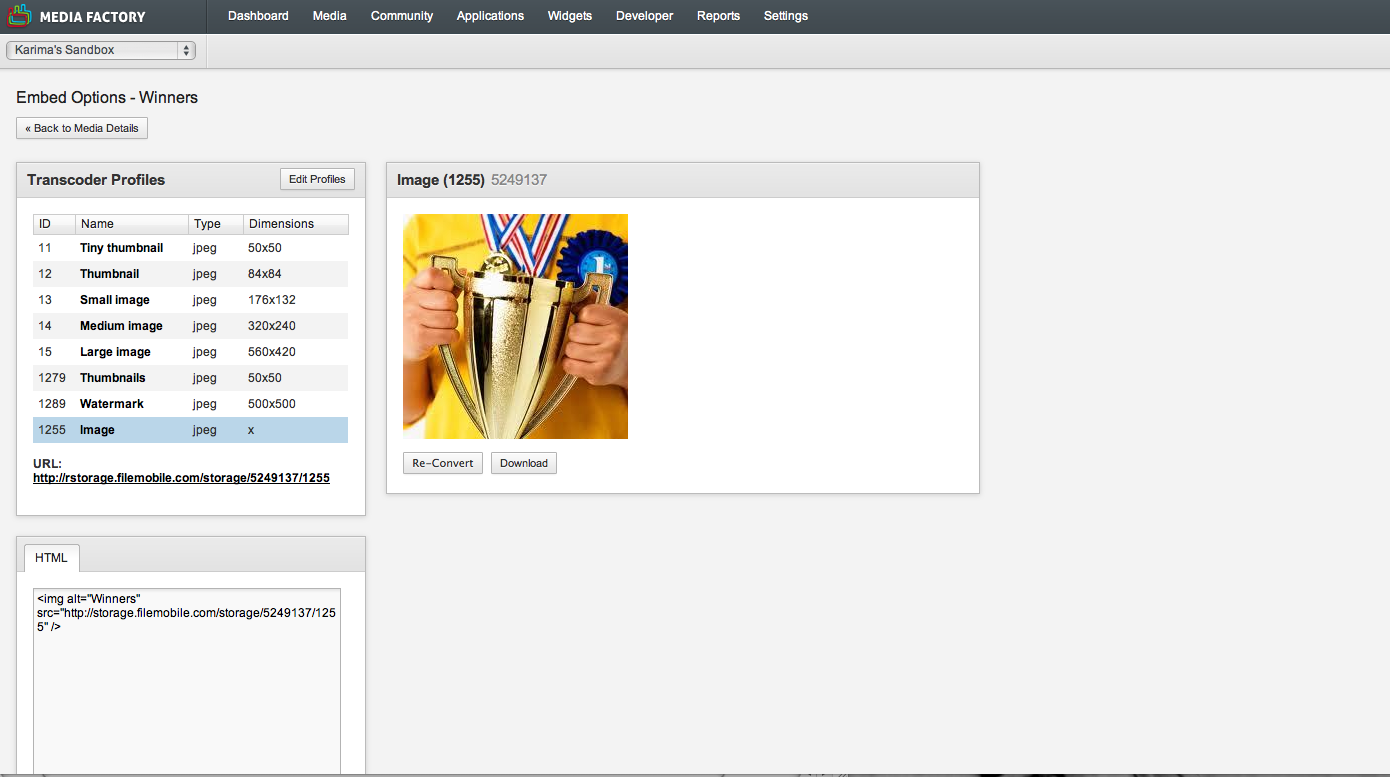
Note: If you are not satisfied, click the Edit Profiles button to go back to the Media Transcoder profiles. From the Media Transcoder page, select the profile you want to change.
To apply transcoder settings to all media in Contest:
- In the Navigation bar, select Settings>Media Transcoder.
- On the Media Transcoder page, locate and copy the profile ID number of the profile you would like to apply to all media in Contest.
- In the Navigation bar, select Applications>Applications.
- On the Applications page, select an application.
- Under Sections, click Application templates.
- On the Application Templates page, select entry.
- Edit the code around line 33-34 by replacing “15” with the profile number.
<fm:Case value=“1”><img src=”{$$media_publicUrl}/15” alt=”{$$media_title}” /></fm:Case>
- Click Save.
Applying Transcoder settings to all media in Community
- In the Navigation bar, select Settings>Media Transcoder.
- On the Media Transcoder page, locate and copy the profile ID number of the profile you would like to apply to all media in Community.
- In the Navigation bar, select Applications>Applications .
- On the Application page, s elect an application.
- Under Sections, click Application t emplates.
- On the Application Tempates page, select mediadetails.
- Edit the code around line 33-34 by replacing “15” with the profile number
<fm:Case value=“1”><img src=”{$$media_publicUrl}/15” alt=”{$$media_title}” /></fm:Case>
- Click S ave.
New Developments:
http://developer.filemobile.com/releasenotes-mediafactory-feb14-2012

